
Complete Guide to Python Envs (MacOS)
Christos Hadjinikolis, 14 February 2021
Configuring python on your machine for the first time is a definite headache for any software engineer that decides to delve into the world of python. Doing it properly confuses a lot of people and can prove to be very challenging.
It is often the case that many developers have numerous interpreters configured on their machines, without knowing where they live.
Most common ways of setting up Python
Firstly, there is a Python version that ships with macOS, but it is usually v2.7, which is not just out of date but also deprecated.
So, commonly, most users will download the latest Python release and move it to their $PATH
or use brew install python3 (which does this for them).
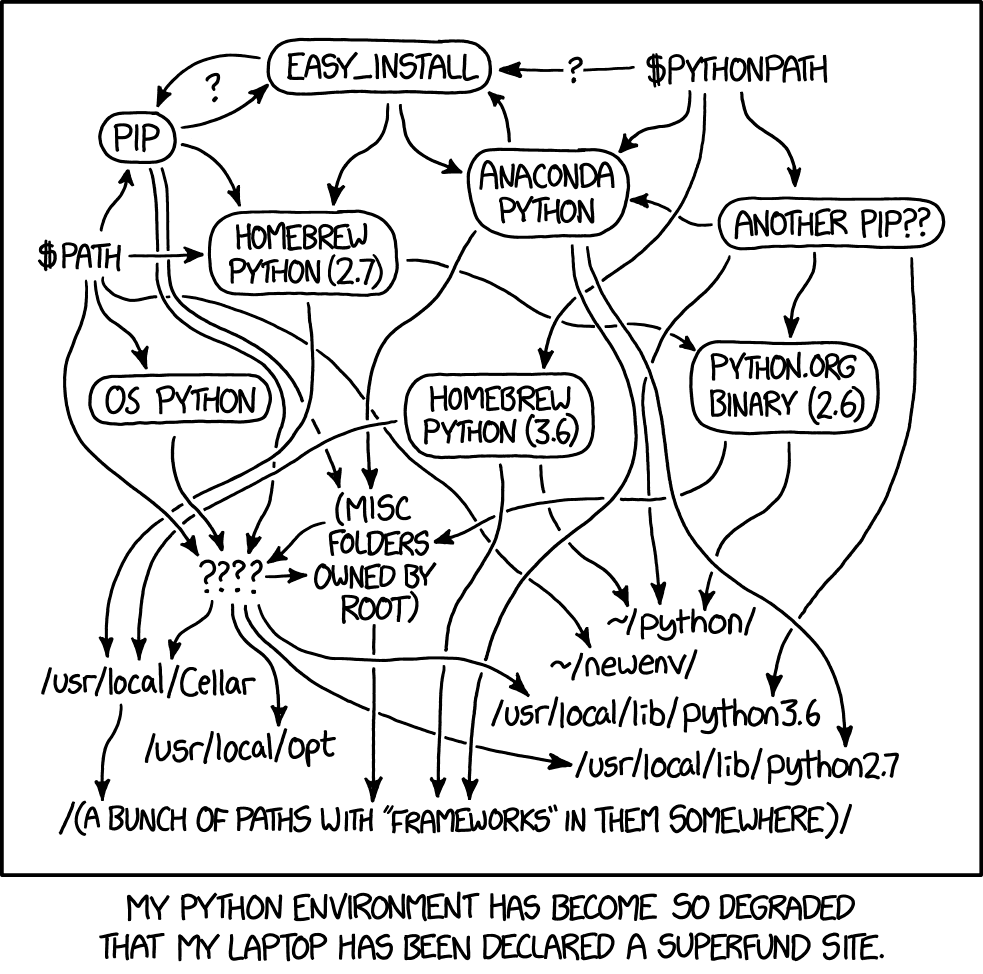
Both of these solutions can cause many problems that will not be evident straight away. The main challenge, is usually not knowing, at any given time, what is the “default Python” that your system is using. Ideally, this is something you shouldn’t care about, but if you don’t set up things properly, you end up installing packages for the wrong environment or the wrong active python interpreter, un-intentionally created from the wrong python distribution and… well, you get the point (…this is pretty much summed up in the xkcd image above).
To find out more details, read this excellent December 2020, post, by Matthew Broberg.
How to avoid all these?
The short answer is “use pyenv”. pyenv will enable you to not only setup python properly on your machine, but
to also manage different versions and python environments in a simple and straightforward way. As
explained on the package’s github page:
“It’s simple, unobtrusive, and follows the UNIX tradition of single-purpose tools that do one thing well.”
For me, its main benefits are:
- It depends on Python itself, i.e. since it was made from pure shell scripts, there is no bootstrap problem of Python.
- It manages the need to be loaded into your shell though
pyenv’s shim approach, which adds a directory to your$PATH. - It manages virtual environments, though I recommend using
pyenv-virtualenvto automate the process.
Let’s get to it
Before you do anything make sure you start with a clean sheet. To do so, uninstall or remove any python distributions you already have. I strongly advise you to follow this link.
Now, assuming you have brew installed on your machine, do:
$ brew update
$ brew install pyenv
We will now need pyenv-virtualenv. pyenv-virtualenv is a pyenv plugin that provides features
to manage virtualenvs and conda environments for Python on UNIX-like systems.
$ brew install pyenv-virtualenv
Setting up your global interpreter
So, the first thing you want to do is set up your global interpreter. This is the python environment that will be used by default by your system, unless you dictate otherwise.
If you run:
$ pyenv install --list
Available versions:
  2.1.3
...
  3.10-dev
  activepython-2.7.14
...
  activepython-3.6.0
  anaconda-1.4.0
...
  anaconda3-2020.07
  graalpython-20.1.0
  graalpython-20.2.0
  ironpython-dev
...
  ironpython-2.7.7
  jython-dev
...
  jython-2.7.2
  micropython-dev
...
  miniconda-latest
...
  miniconda3-4.7.12
  pypy-c-jit-latest
...
  pypy3.6-7.3.1
  pyston-0.5.1
...
  pyston-0.6.1
  stackless-dev
...
  stackless-3.7.5
You will see the full list of python distributions available for installation.
Choose the one you want and do, e.g. 3.9.0:
$ pyenv install 3.9.0
python-build: use openssl@1.1 from homebrew
python-build: use readline from homebrew
Downloading Python-3.9.0.tar.xz...
-> https://www.python.org/ftp/python/3.9.0/Python-3.9.0.tar.xz
Installing Python-3.9.0...
python-build: use readline from homebrew
python-build: use zlib from xcode sdk
Installed Python-3.9.0 to /Users/<username>/.pyenv/versions/3.9.0
Once installation is complete, you can set this version as your global:
$ pyenv global 3.9.0
At this point, one should be able to find the full executable path to each of these using pyenv version.
$ pyenv version
3.9.0 (set by /Users/<username>/.pyenv/version)
Creating and managing virtual environments automatically
This is a standard practice when working with python. The idea is to keep different environments isolated.
Each python environment can be associated to multiple projects, but it is generally better to just go for a
one to one mapping.
Why you say? Well, for starters, this helps you maintain your system clean by not installing system-wide libraries that you are only going to need in a small project. It also allows you to use a certain version of a library for one project and a different version for another. Finally, it helps make your project reproducible and ensures it is configured in an identical manner across local environments amongst collaborating developers.
Let’s go through an example.
Suppose you have a github root directory where you clone and maintain all your projects and it looks like this:
GitHub
├── project_a
└── project_b
What you want to do is setup a different python virtual environment per project. What’s more is that
you would like to automatically activate that virtual environment by means of simply accessing (cd-ing)
into that project. Let’s see how we can do that.
First, I ‘ll assume you are using .zshrc as your default shell and have configured oh-my-zsh.
If not, then just set it up. Note that this is not a pre-requisite; it’s more of a
personal preference, but using oh-my-zsh does come with many benefits, like showing the current active
python environment on your console, which is why I am recommending it.
In order to enable the above automations, we will need two pre-requisites. The first, is to include
2 files in each project (you can version control these files). The first is .python-version and the
second is .python-virtualenv, as per the below tree:
GitHub
├── project_a
│   ├── .python-version
│   └── .python-virtualenv
└── project_b
    ├── .python-version
    └── .python-virtualenv
In each of these files you just add a line at the very top of the file with:
- the python version you want to use
- the name of the virtual environment you want to create.
For example, the contents of
GitHub
├── project_a
│   ├── .python-version
can be:
3.9.0
and:
GitHub
├── project_a
│   └── .python-virtualenv
can be:
project-a-venv
similarly, for project b you can have 3.8.2 and project-b-venv.
Now, on to your .zshrc. Do:
$ vi ~/.zshrc
and add the following script:
# Define your $PATH
export PYENV_ROOT="$HOME/.pyenv"
export PATH="$PYENV_ROOT/bin:$PATH"

# Automatic venv activation
eval "$(pyenv init -)"
eval "$(pyenv virtualenv-init -)"
export PYENV_VIRTUALENV_DISABLE_PROMPT=1

# Undo any existing alias for `cd`
unalias cd 2>/dev/null

# Method that verifies all requirements and activates the virtualenv
hasAndSetVirtualenv() {
  # .python-version is mandatory for .python-virtualenv but not vice versa
  if [ -f .python-virtualenv ]; then
    if [ ! -f .python-version ]; then
      echo "To use .python-virtualenv you need a .python-version"
      return 1
    fi
  fi

  # Check if pyenv has the Python version needed.
  # If not (or pyenv not available) exit with code 1 and the respective instructions.
  if [ -f .python-version ]; then
    if [ -z "`which pyenv`" ]; then
      echo "Install pyenv see https://github.com/yyuu/pyenv"
      return 1
    elif [ -n "`pyenv versions 2>&1 | grep 'not installed'`" ]; then
      # Message "not installed" is automatically generated by `pyenv versions`
      echo 'run "pyenv install"'
      return 1
    fi
  fi

  # Create and activate the virtualenv if all conditions above are successful
  # Also, if virtualenv is already created, then just activate it.
  if [ -f .python-virtualenv ]; then
    VIRTUALENV_NAME="`cat .python-virtualenv`"
    PYTHON_VERSION="`cat .python-version`"
    MY_ENV=$PYENV_ROOT/versions/$PYTHON_VERSION/envs/$VIRTUALENV_NAME
    ([ -d $MY_ENV ] || virtualenv $MY_ENV -p `which python`) && \
    source $MY_ENV/bin/activate
  fi
}

pythonVirtualenvCd () {
  # move to a folder + run the pyenv + virtualenv script
  cd "$@" && hasAndSetVirtualenv
}

# Every time you move to a folder, run the pyenv + virtualenv script
alias cd="pythonVirtualenvCd"
Save your changes, return to your terminal and either restart your terminal or do:
$ source ~/.zshrc
Now, let’s assume that you are in GitHub directory:
$ pwd
/Users/<username>/Github
Then, if you do:
~/GitHub $ cd project_a
created virtual environment CPython3.9.0.final.0-64 in 448ms
  creator CPython3Posix(dest=/Users/<username>/.pyenv/versions/3.9.0/envs/project-a-venvo, clear=False, no_vcs_ignore=False, global=False)
  seeder FromAppData(download=False, pip=bundle, setuptools=bundle, wheel=bundle, via=copy, app_data_dir=/Users/<username>/Library/Application Support/virtualenv)
    added seed packages: pip==20.3.1, setuptools==51.3.3, wheel==0.36.2
  activators BashActivator,CShellActivator,FishActivator,PowerShellActivator,PythonActivator,XonshActivator
(project-a-venv) --------------------------------------------------------------------------------
~/GitHub/project_a $
and, if you come out of it and change to project b:
$ cd ../project_b
created virtual environment CPython3.8.2.final.0-64 in 932ms
  creator CPython3Posix(dest=/Users/<username>/.pyenv/versions/3.8.2/envs/project-b-venv, clear=False, no_vcs_ignore=False, global=False)
  seeder FromAppData(download=False, pip=bundle, setuptools=bundle, wheel=bundle, via=copy, app_data_dir=/Users/<username>/Library/Application Support/virtualenv)
    added seed packages: pip==20.3.1, setuptools==51.3.3, wheel==0.36.2
  activators BashActivator,CShellActivator,FishActivator,PowerShellActivator,PythonActivator,XonshActivator
(project-b-venv) --------------------------------------------------------------------------------
~/GitHub/project_b $
Now, two new virtual environments have been created:
$ pyenv versions
system
* 3.8.2 (set by /Users/<username>/GitHub/project_b/.python-version)
  3.8.2/envs/project-b-venv
  3.9.0
  3.9.0/envs/project-a-venv
and every time you cd into these directories, your pyenv will switch automatically.
Note 1:You may face some issues with python 3.8.7.Note 2:To uninstall a python env, do:pyenv uninstall 3.8.2/envs/project-b-venv
Using jupyter notebook or jupyter lab with a virtual environment of your choice
Finally, suppose you want to use a python environment with a jupyter notebook. This is not as straightforward as one would think. Here is how you would do it.
Let’s continue from where we left things in the previous section. You are in:
GitHub
├── project_a
and you have project-a-venv activated:
(project-a-venv) --------------------------------------------------------------------------------
~/Github/project_a $
First thing you need to do is install ipykernel using pip:
$ pip install ipykernel
Next, you need to install a new kernel:
ipython kernel install --user --name=project-a-venv
Finally, assuming you have jupyter or jupyterlab installed, you can start jupyter, create a new notebook and select the kernel that lives inside
your environment.
$ jupyter notebook
Final notes
I really hope that this was a helpful post and if you are new to python, I hope that I have helped you disambiguate some confusing aspects of configuring python at the start of your journey!
The bellow references were very helpful for putting together this post:
- The right and wrong way to set Python 3 as default on a Mac
- Automatic activation of virtualenv (+ pyenv)
Remember to like my post and re-share it (if you really liked it)!
See you soon!
 Register to the ML-Affairs RSS Feed
Here is my latest post on configuring `Python Envs`https://t.co/uaW70OrOyh
— Christos Hadjinikoli (@chatzinikolis) February 14, 2021